Archive for the ‘FOODWAYS’ Category

Anise-Honey Cookies

December 27, 2023

Recently, I wanted to try something new in the kitchen. I decided that in honor of the season, I would bake cookies in tribute of Hanneke, protagonist of my soon-to-be-three Hanneke Bauer Mysteries.

Many classic “German” cookies exist, but in the 19th century, there was a lot of cultural diversity between regions. Hanneke came from Pomerania, and I was hoping to find something specific to her background.

I turned to Favorite Recipes of Pommern Cooks, published by the Pommerscher Verein Friestadt in 1992.

If you’d like more information about this cookbook, click HERE.

That cookbook contains a number of cookie recipes, but I chose Anise-Honey Cookies. The descendant who contributed the recipe added this note: ”I know this recipe came from the old country.” 

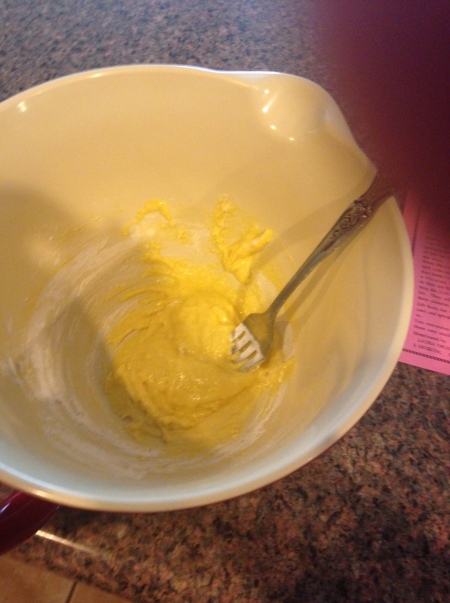
The recipe calls for a rolled cookie. Lacking some of Karoline Ketlzer’s creations, I used an old family doughnut cutter.

The dough was quite sticky. In order to roll and cut the cookies I had to add so much flour that my first ones were heavy.

I decided to use the dough to make drop cookies. They were delicious!

Rolled cookies and drop cookies.

If you need a break from sugar-coated cookies, I recommend these. They would also be perfect for a book group gathering. The recipe is below, as printed in the cookbook.

Notes: I cut down on the sugar. Also, I started with whole star anise and buzzed a few pods in my spice grinder. The anise does impart a strong flavor, but I like it.

Anise-Honey Cookies

3 eggs, beaten
2 c. sugar
2. c. honey, heated
2 T. ground anise
1 T. baking soda
1 t. ground cloves
4 c. flour (approximately)
pinch of salt

In a medium size mixing bowl, beat the eggs and sugar until thick and lemon color. Add honey and pour mixture into a large mixing bowl. Sift flour, anise, cloves, baking soda, and salt. Stir into egg mixture. This is not enough flour. You need to add enough flour to form dough stiff enough to roll out and make into animal cookies. Bake at 350 degrees until you can touch lightly in the middle and it doesn’t make an indent.

I hope you enjoy!

Chloe’s Lingonberry-Curry Stir-Fry

January 24, 2023

Usually Chloe and I are all about tradition in the kitchen, but sometimes it’s nice to mix things up a bit. Most recently, Chloe did so at the beginning of The Weaver’s Revenge.

As Roelke helps Chloe prepare for a road trip, her sister Kari arrives unexpectedly, prompting the following exchange:

“I didn’t expect to see you today, Kari,” Chloe said.

“Since you’re traveling, I brought Roelke dinner. Chicken pot pie.”

“That’s kind, but hardly necessary.” Chloe sounded mildly aggrieved. “I left plenty of food in the fridge, including a lingonberry-curry stir-fry.”

Kari looked aghast. “Lingonberry…what?”

“It’s actually quite good,” Roelke admitted, almost embarrassed by the admission.

I developed this recipe several years ago, and Mr. Ernst and I enjoy it as much as Roelke does! In addition to tasting good, it’s a quick and healthy meal. Scroll for the recipe.

The Sauce
Note: This recipe makes about 1 cup of sauce, which is enough for two stir-fries. I freeze half to have ready the next time I cook the dish.

1 10-oz. jar of Lingonberry preserves
4 T. white wine vinegar
1 T. Dijon mustard
1 T. minced garlic
3-4 T. curry powder

Stir all ingredients together until blended.

Beautiful, yes?

The Stir-Fry
For the version pictured below I used 14 oz. of vegetarian protein and 6 cups of mixed chopped vegetables (carrots, snap peas, broccoli, and bok choi.) You can use whatever your family favors.

To prepare, heat a large skillet and add enough cooking oil to lightly coat the bottom. Cook the veggie protein or meat as directed on the package, in a large skillet. Add the vegetables and cook for about three minutes, stirring frequently. Add half of the lingonberry-curry sauce (about 1/2 cup), mix in well, and bring to a simmer.

Serve over rice. These proportions make four servings.

Happy cooking!

Kuchen

April 12, 2022

In the first chapter of Lies of Omission, protagonist Hanneke Bauer parts company with a traveling companion when their ship docks in Milwaukee. Her friend says, You must promise to accompany your husband if he brings crops to sell in the city. We’ll have coffee and kuchen while you tell me all about the farm.

Kaffee und Kuchen (coffee and cake) is a German tradition of long standing. The term suggests not just tasty food, but conversation and camaraderie as well.

There are, of course, many kinds of German cake. The first kuchen I learned to make called for a slightly-sweet yeasted dough with fresh fruit on top, formed in a skillet and baked in an antique cookstove.

Chopping rhubarb for kuchen at the Schottler house, Old World Wisconsin, 1981.

I recently baked a kuchen in Hanneke’s honor, using peaches and raspberries I had in the freezer.

I don’t have a copy of the recipe I used way back when, so I turned to the cookbook pictured below, compiled by the Pommerscher Verein Friestadt of Mequon, WI. (The Pomeranian Society of Friestadt is dedicated to preserving Pomeranian culture and history.)

Happily, I’m able to share the recipe with you!

Apple or Raspberry Kuchen

1/2 c. shortening
1-1/4 c. flour
1 T. sugar
pinch of salt
1 egg
2 T. milk
3-4 cups of apples or raspberries
For Streusel: 1 c. sugar, 2 T. flour, 1 T butter, a little cinnamon (omit if using raspberries)
1/4 c. cream or evaporated milk

Mix the first five ingredients like pie crust, then add the beaten egg and milk. Pat in pan. Spread apples or raspberries over crust and spread streusel over the fruit.

Bake 375 for 30 to 45 minutes or until crust is light brown. About 10 minutes before it is done, pour the cream or evaporated milk over the top.

(Note: I omitted the cream and went very easy on the streusel.)

In Lies of Omission, Hanneke is offered a piece of kuchen at a very low moment:

Hanneke accepted it gratefully. Kuchen. She broke off a chunk, careful to catch the crumbs, and popped it into her mouth. The pastry was light with wheat flour, topped with crunchy crystals of sugar that perfectly complemented the tart goodness of diced rhubarb. She was poised to gobble the slice whole, but at the last moment she paused, broke what was left in two, and handed half back. “Why don’t we share.”

If you bake and perhaps share a kuchen, I hope the experience is equally satisfying!

Kransekake

January 4, 2020

For the final scene in Fiddling With Fate, the 10th Chloe Ellefson mystery, I needed a special and festive Norwegian cake. The decision was easy: kransekake!

The Norwegian kransekake, or wreath cake, is formed from a series of concentric rings, stacked to make a cone.

(Wikipedia)

I like to experiment in the kitchen, but to learn about making kransekakes, I turned to some experts at the Sons of Norway-Mandt Lodge in Stoughton, WI.

Vicky, Joyce, and Carol

Special pans allow bakers to create perfectly sized tiers.

My reader-friend Larry, who also writes about Norwegian heritage, recently speculated that immigrants would not have been likely to pack such tins in their trunks. It is possible to make the rings without the pans, although it is much harder to get them sized correctly! I don’t know when the special pans became popular, but today you can buy them in a set from most any Scandinavian import shop. (The cakes are also popular in Denmark. Kransekage is the Danish spelling.)

The thick dough is made of almond meal, powdered sugar, and egg whites. You can grind your own almonds, but buying meal saves time.

Once the dough is mixed, small portions are rolled out into long lengths by hand. It takes practice to get them even and sized properly for the pans. (I could identify my rings because they were less uniform than the others!) It’s also best to work quickly so the dough doesn’t dry and crack.

Once a roll is made, the baker breaks off pieces and fits them into the pans.

Kransekakes commonly have eighteen layers (some even more), although you can also make smaller ones. That’s what we did, which is why all the rings weren’t filled.

It takes a careful eye to get the rings baked properly. They must be chewy, but firm enough to stack.

At that point, they come out of the pan to cool. If you’re doing multiple cakes at once, keep the rings organized in sets!

The ladies assured me that all the wobbles and bobbles in my rings would disappear when the traditional drizzle of frosting was applied. Below is my first mini-kransekake, and it did look much nicer once I decorated it.

It’s also possible to pack the baked rings away in the freezer, to be assembled right before serving.

When I celebrated the launch of Fiddling With Fate with a special dinner and program at the Lodge, my baker-friends kindly agreed to make kransekakes so guests could enjoy the cake Kari made for Chloe and Roelke in the book. We baked a small one for each individual table. Doesn’t it look festive?

The ladies also made one full-sized kransekake so guests could get the impact of a full tower!

It also let Mr. Ernst and I demonstrate a wedding tradition. After the feast the groom covers the bride’s eyes, and she picks up the top layer of the kransekake. However many layers come up with it, attached by frosting, indicate how many children the couple will have!

I’m glad I had tutelage, but once you get the hang of it, making kransekakes is easier than it might appear. And while the simple loops of white frosting might be most common, bakers can decorate however they wish. Sometimes small gifts are attached, or—at weddings—tiny objects of importance for the bride and groom.

If you want to try baking a kransekake, a set of purchased pans will come with a recipe. You can also find recipes online and if you feel daring, try baking one free-form. Let me know how it turns out!

Rømmegrøt Bars

November 21, 2019

I love exploring historic and ethnic food traditions. Working at Old World Wisconsin in the 1980s and ’90s provided my first opportunity to delve into traditional Norwegian foodways.

Making krumkake on a wood stove at the 1865 Kvaale Farm.

Deciding to make Chloe Ellefson (protagonist of my mystery series) a Norwegian-American rekindled my interest in traditional foods. I imagined taking plates of Norwegian cookies to every library program and bookstore visit.

While writing Heritage of Darkness, a Norwegian-themed book that mentions traditional holiday baking, I took a hands-on class about Norwegian cookies. (You can get a peek at that experience HERE.)

Sandbakkels

I’m sorry to say that the whole idea of baking dozens of cookies for readers never materialized. The traditional Norwegian treats I’m familiar with are putzy. I’m not opposed to putzing; I just don’t have time.

So when I contemplated the idea of refreshments for the launch party for Fiddling With Fate, which is largely set in Norway, I compromised. First, I ordered rosettes from the Fosdal Home Bakery in Stoughton, WI.

Second, I whipped up a couple of batches of rømmegrøt bars.

Rømmegrøt is a Norwegian porridge. In the summer, Norwegian women at the high pastures mixed together sour cream, milk, flour, and butter to make a rich, thick dish topped with melted butter and, sometimes, sugar and cinnamon.

(Wikipedia)

Although I love rømmegrøt, the logistics involved with serving warm porridge in a bookstore seemed challenging.

Rømmegrøt bars are reminiscent of the porridge, delicious, and super-easy to make. I got the recipe from my friend Darlene, who often baked them for students attending folk art classes at Vesterheim Norwegian-American Museum.

Rømmegrøt Bars

  • 2 tubes Pillsbury Crescent Rolls (or Pillsbury Baking Sheets, which do not have perforations; I’ve also used Crescent Rounds)
  • 2 8-oz. packages cream cheese, softened (I’ve used Neufchatel)
  • 1 c. sugar
  • 1 egg, separated
  • 1 t. vanilla
  • 1/3 c. sugar
  • 1/2 t. cinnamon

Grease a 9 x 12 ” pan. Preheat oven to 350 degrees.

Open one can of crescent rolls and carefully unroll the dough. Place on the bottom of the pan. Gently spread the dough with your fingers until it touches the sides of the pan. Try not to let it get too thick along the edges.

Cream together cream cheese, sugar, vanilla, and the egg yolk. Spread this mixture over the dough in the pan. Unroll the second can of dough and place over this filling.

Beat the egg white until foamy and spread on top of the dough. Mix sugar and cinnamon and sprinkle on top. Bake 25-30 minutes. Cool and cut. Store in refrigerator. Cut bars can be frozen.

Enjoy!

Libby’s Legendary Banana Bread Pudding

January 22, 2019

PrintSometimes you just need some comfort food—something steaming and fragrant and utterly delicious.

The 9th Chloe Ellefson Mystery, The Lacemaker’s Secret, begins at just such a moment.

   “Something is burdening you,” Libby told Roelke McKenna. “Spill it. Now.”

   “Nothing’s wrong.”

     Libby’s eyes narrowed. “I don’t believe you.”

   Roelke turned to the kitchen counter where an old-fashioned percolator burbled with promise. Trust his cousin to just know. He’d had another rough night, but he didn’t want to talk about it.

   . . . Libby turned and cracked the oven door. A rich wave of banana, vanilla, and cinnamon swirled into the room.

   “Please tell me that’s Libby’s Legendary Banana Bread Pudding.” Roelke’s favorite Sunday-morning treat at his cousin’s house.

I came up with this recipe for Banana Bread Pudding on a frigid Wisconsin morning. It pairs beautifully with the delectable maple sauce, so don’t skip that step! 

Pudding Ingredients
3-4 ripe bananas
4 c. 1-inch bread cubes (French, Italian, or any other sturdy type)  
3 large eggs
2 cups milk (soy or dairy)
2 t. vanilla extract
1 t. ground cinnamon
1/2 t. ground nutmeg
1/2 t. ground cardamom (optional)
1 c. chopped walnuts (optional)

Note: Because the sauce is sweet, I used no sugar in the bread pudding itself. If you prefer a sweeter version, add 1/4 c. or 1/2 c.

 Maple Sauce Ingredients
3 T. butter

2 T. sugar (raw or granulated)
1 T. cornstarch
3/4 c. milk
1/4 c. maple syrup
1-1/2 t. vanilla extract

Instructions
Grease a 2-quart casserole. Pre-heat oven to 375.  

Place the bread cubes in a large bowl.

img_0001

I used half a small loaf of Italian bread. Bread that’s a day or two old will retain its texture better than soft bread.

In another bowl, beat the eggs with a whisk. Stir in milk, vanilla, and spices. Add sugar, if using.  

Set one banana aside, slice the others into this mix, and stir to coat. Add this mixture, and walnuts if using, to the bread cubes. Gently stir.

img_0006

Stir the pudding into the casserole dish. Slice the final banana over the top.

Banana Bread Pudding

Use banana that are ripe but firm if you want to retain their texture. Over-ripe bananas can be mashed and mixed with the bread mixture.

Bake for about 40 minutes. Towards the end of the bake start the maple sauce (directions below).

Remove the casserole when the pudding is golden brown and a skewer inserted into the center emerges clean.  

Banana Bread Pudding

Fresh from the oven.

When the pudding is partly baked, begin the Maple Sauce by melting the butter in a small saucepan. Mix the sugar and cornstarch together and stir into the melted butter.

Add the milk and maple syrup, whisking continuously. Continue stirring until the mixture comes to a low boil. Let simmer until thickened, about a minute or so.

Banana Bread Pudding sauce.

The silky-smooth sauce just coming to a simmer.

 Remove from heat and stir in the vanilla extract.

Serve the pudding warm, topped with the warm maple sauce.

img_0014

I think Libby and Roelke would enjoy this version of Banana Bread Pudding. I hope you do as well!

Belgian Pies

October 15, 2018

There are lots of fun things about writing a mystery series that celebrates ethnic heritage. One of those is the chance to explore food traditions.

When I started researching The Lacemaker’s Secret, which focuses on Belgian immigrants in northeast Wisconsin, I quickly discovered the importance of Belgian pies.

Belgian pies are a staple of Kermiss, the annual celebration of thanks for a good harvest:

“Then came the baking, which in the early days could only be done in outdoor ovens. …The Belgian pie! What would the Kermiss be without the famous delicacy, the crust of which was made of dough, spread over with prunes or apples and topped with homemade cottage cheese. So tasty it was that one bite invited another.”  (Math S. TlachacThe History of the Belgian Settlements.)

The outdoor bake ovens could hold as many as three dozen pies. Children were charged with the huge jobs of pitting and grinding prunes, peeling apples, washing dishes.  It wasn’t uncommon for several women working together to produce hundreds of pies. In fact, Belgian pie-making dwindled in recent years because many of the recipes handed down were for enormous proportions.

Photo on display at the Belgian Heritage Center, Namur, WI.

My husband and I first sampled Belgian pie while attending the Kermiss held at the Belgian Heritage Center.

Belgian Pies

An efficient storage system. They were going through the pies fast.


An enthusiastic thumbs-up from Mr. Ernst.

Belgian pies are smaller than American pies. Most consist of a yeast-raised dough, a fruit filling, and a top layer of cheese. Traditional flavors are apple and prune. Rice pies are also traditional. Those are topped with whipped cream instead of the cheese.

To learn more, I signed up for a class taught by Gina Guth in Door County. Gina has deep Belgian roots on her mother’s side, and has been making pies for years.  In addition to baking for Kermiss, her mom made thousands of pies for customers at the family tavern.  Gina has adapted recipes for home use.

This wonderful photo of Gina’s mother appeared in the Appleton, WI’s Post-Crescent newspaper, 1969.

During class, Gina provided four types of pie for us to try:  apple, prune, Door County cherry, and rice.

The cheese topping is made with cottage cheese sweetened with butter, sugar, and egg yolks.

Gina demonstrates squeezing excess liquid from the cottage cheese.

The dry curds.

Each student got to make two pies. I chose to make cherry and rice. The dough is pressed into the bottom of pie pans, then almost covered with the topping.

If you live within driving distance of Sturgeon Bay, WI, I recommend Gina’s class at The Flour Pot bakery.  Individuals can also register through the St. Norbert College Outreach/Cooking Class program.


As is true in any community, local bakers don’t always agree on the elements of a traditional Belgian pie. For another take, with recipes, see Edible Door County.

Ethnic Cooking Wisconsin Style (American Cancer Society, 1982) includes several Belgian Pie recipes.

Ethnic

This cookbook includes directions for making the more traditional dry cottage cheese topping.  It calls for blending 1 pound of cottage cheese, 1-1/2 T. sugar, 1 egg, 1 T. whipping cream, a dash of cinnamon, and 1/4 t. salt.  Force the mixture through a sieve, and spread onto pies (this amount covers 4 pies) before baking.

If your book group is reading A Lacemaker’s Secret, why not make a Belgian Pie?

You can also find them, fresh or frozen, at Marchant’s Foods in Brussels, Wisconsin.

piesign

frozenpies

Happy reading, and happy baking!

Springerle

November 29, 2016

I love including food traditions in the Chloe Ellefson mysteries.  A Memory of Muskets features German heritage. Rosina, the main character in the historical plotline, brings her Bavarian mother’s springerle mold as a treasured memento when she immigrates to America.

People have been making beautiful springerle for centuries. Some food historians believe these cookies originated in pagan times among Germanic tribes. During Julfest, in the darkest days of the year, rich farmers sacrificed animals to the gods. Peasants made token sacrifices by offering cookies shaped like or decorated with animal designs.

The design is made in the surface of the cookie by pressing a mold onto rolled dough. (Or using a rolling pin carved with the patterns.) Today clay and wooden molds have been replaced by resin, and modern bakers make many different flavors.

springerle molds

I had never baked springerle before, and was eager to try it. My friend Andrea, an experienced springerle baker, gave me some tips. It didn’t sound too difficult, and I decided to bake them for the book’s launch party.

springerle

A sample of Andrea’s beautiful springerle.

I made two kinds. The first was a version made with whole wheat flour and sweetened with sorghum, which was an approximation of what my character Rosina might have been able to make in the 1860s. The second was a fancy anise-flavored batch made with white flour and powdered sugar.

The project was a little trickier, and took a lot longer, than I’d anticipated.

I have limited counter space and use a narrow rolling pin. The first challenge was figuring out how thin to roll the dough, and getting it rolled perfectly evenly.

springerle

The second challenge was figuring out how hard to press the mold into the dough. The mold I’d chosen featured a woman spinning flax, which was perfect to reflect A Memory of Muskets. However, I had some trouble getting all the fine details to show up in the cookies.

springerle

springerle

The final challenge was producing cookies with neat edges. I don’t own a pastry cutter, so I used a pizza cutter and a paring knife.

First try. My edges need some work.

First batch after baking. My edges need some work.

I’m sure I just need more practice. Also, there are helpful tools available for purchase, such as rolling pin guides to ensure even (and proper) dough thickness, and cutters that eliminate the need for trimming the cookies.

img_3363

Historically springerle were leavened with hartshorn salt, also known as baker’s ammonia (ammonium carbonate). Experts say that cookies made with hartshorn salt have a crisper design, but a softer texture than those made with baking powder.

anise

I ended up taking three days to make each batch.  Day 1, make the dough and refrigerate overnight.

img_4060

Day 2, roll the dough, mold and cut the cookies, transfer to a cookie sheet, and let dry overnight. This step helps keep the design sharp during baking.

img_4163

Day 3, bake, cool, store.

img_4213

There are an amazing number of mold designs available, including many reproductions of historic molds. If you’d like to try making springerle, a quick Google search will provide recipes and all the information needed to mail-order molds and other supplies. A good place to start browsing is http://www.springerlejoy.com, but there are other good ones.

I can see why people get hooked on springerle. And yes, I did serve them at my launch party. Not one person mentioned crooked edges.

springerle

Are you planning to bake springerle this holiday season? If so, I’d love to see pictures!

Cooking With Chloe: Ma’s Vanity Cakes

March 9, 2016

Laura Ingalls Wilder fans likely remember the description of Vanity Cakes in By The Banks Of Plum Creek:

(Ma) made them with beaten eggs and white flour. She dropped them into a kettle of sizzling fat. Each one came up bobbing, and floated till it turned itself over, lifting up its honey-brown, puffy bottom. Then it swelled underneath till it was round, and Ma lifted it out with a fork. She put every one of those cakes in the cupboard.  They were for the party.

They sound deceptively simple, but Laura never learned to make Vanity Cakes.  After the success of her first books, she tried to rediscover the secret. On June 22, 1925, she wrote to her Aunt Martha asking for the recipe:

(Excerpt; original letter in the Herbert Hoover Presidential Library)

(Excerpt; original letter in the Herbert Hoover Presidential Library)

Mother used to make what she called “Vanity Cakes” years ago. They were mostly egg and they were fried in deep fat. When done they were simply bubbles, usually with a hollow center and they were crisp around the edges.  …I would so much like to have the recipe.

Aunt Martha responded:

(Excerpt; original letter in the Herbert Hoover Presidential Library)

(Excerpt; original letter in the Herbert Hoover Presidential Library)

The vanity cake that you ask about is just made out of egg (someone penciled in “one or two”) and flour, a pinch of salt; pinch (off) in little pieces and rolled out as thin as you can and fried in hot lard.  …They were called vanity cakes because there was nothing to them.

If you search the internet for “Vanity Cakes,” you’ll find a lot of blog posts written by people who have tried to make them, most with less than stellar results.

At a program last fall two readers, Kami J. and her mom Sharon, volunteered to make Vanity Cakes and report back. They too were disappointed with the results. (I don’t usually post recipes unless test bakers/cooks are happy with the finished product, but so many people are curious about Vanity Cakes that I’m making an exception.)

Here’s the recipe.

The recipe on this vintage card

The recipe on this vintage card is still available at some of the homesites. (No additional credit provided on this card.)

Note that it does not call for rolling out the dough thinly, as Laura’s aunt instructed.

Kami reported, We ended up adding more than 3 oz. of flour.  The first picture shows the better with that amount.

vanity cakes

There was no way we would have been able to make them into small pancakes without more flour. We added about double the specified amount.

vanity cakes

vanity cakes

We fried them, and rolled them in powdered sugar.

vanity cakes

They tasted OK, but were not very flavorful.

vanity cakes

I checked my copy of The Little House Cookbook: Frontier Foods from Laura Ingalls Wilder’s Classic Stories, by Barbara M. Walker (Harper & Row, 1979).

The Little House Cookbook

Her recipe for 6 Vanity Cakes calls for 1-2 pounds of lard (for frying), 1 large egg, a pinch of salt, 1/2 c. unbleached all-purpose flour, and a shakerful of powdered sugar—almost identical to the printed card.

She notes in the introduction:  …Not all dishes will be greeted with enthusiasm at the table; some are admittedly historic, rather than taste sensations.  But all are revealing in one way or another.

Perhaps Vanity Cakes were simply a novelty for children used to very simple fare. As Laura’s aunt said in the letter, We did not have many receipts (i.e., recipes) (in) those days for we did not have anything to do with (I interpret this to mean they had few supplies to work with.) We used to make them for a change.

If you’re interested in learning more, I do highly recommend The Little House Cookbook.

Have you tried making Vanity Cakes?  If so, I’d love to hear about your experience!

Cooking With Chloe: Steamed Puddings

December 11, 2015
Last spring I invited Chloe readers to try one of the old recipes I collected while writing Tradition of Deceit.  Mary M., who is experienced with period foodways, volunteered to try a couple of steamed pudding recipes. I decided to save her report until the holiday season. If you’ve always wanted to try a steamed pudding, read on!
Version 2

Old cookbooks tend to assume the users have a lot of experience/knowledge.
Mary kindly shared some general instructions; read through those before trying one of the recipes.
* * *
Steamed puddings are basically a cake baked in moist heat and a covered container, as opposed to baking in an oven’s dry heat in an uncovered pan. Steaming was a practical method of baking in the days when ovens were small and stoves were kept burning all day (for example, to heat water).
 
EQUIPMENT

Use:  A pudding mold with a lid. You can find these in specialty kitchen stores or online. It’s important to butter or coat mold with nonstick spray, and equally important to butter/spray the lid, too.


Equipment -steamed pudding

Or use:  A large coffee can, buttered or sprayed. Don’t use the original plastic lid of the coffee can! Instead, tie heavy-duty foil over the top of the coffee can, and remember to butter/spray the foil.

pudding 1

(Note from Kathleen – A few years ago my younger sister and I experimented with a Christmas pudding. Since we didn’t have a mold, we used coffee cans.)


You can use: A metal mold intended for desserts or decoration. I tried using my mom’s old decorative copper mold (with a foil “lid”). It worked fine for the pudding, but was a nightmare to clean…and my mom’s mold never looked the same again.

RACK
Use:  I found a round metal rack that fits perfectly in my Revere Ware dutch oven. It sits a good 1/2″ above the bottom of the dutch oven.

Or use:  If you have trouble finding a rack small enough, you can use 2 or 3 metal rings from canning jars. (Don’t use the flat removeable metal lids that go inside the rings; just use the rings.) This works fine.


pudding 2

(From Kathleen:  I used canning rings, just as Mary suggests, for the rack.  I fastened them with twisties.)


Don’t use:  Once I tried using a decorative cast iron trivet that barely sits above the bottom of my dutch oven. This did NOT work! There has to be room between the bottom of the pot and the bottom of the mold so that the water can circulate.
OTHER TIPS:

Keep the water in the pot boiling or simmering throughout the steaming process.

The water should come up at least halfway up the pudding mold. Check the water level and add more boiling water if necessary. (Just don’t let the water level get so high up that it goes under the lid and gets into the pudding.)


mold steaming

Once steaming is done, take the mold out of the pot and remove the lid. IMPORTANT! Don’t unmold right away!  Test the cake for done-ness (with a toothpick or skewer, or check to see that it’s pulled slightly away from the sides of the mold). If the pudding is done, let it sit for at least 15 minutes. This allows extra steam to escape and helps the pudding keep its shape.  Unmold and then let cool.

After you butter/spray the mold, you can put a little sugar inside, put the lid on and shake to distribute. This can add a tiny bit of “crust” (for a nice “mouth-feel”) before you add the batter.

I have also spooned some seedless jam into the bottom of the mold before adding the batter, to add a nice color and flavor. (Unfortunately, this didn’t work well with the Whole Wheat pudding.)


Version 2

The puddings Mary steamed came from the Gold Medal Flour Cookbook (1909).

WHOLE WHEAT PUDDING
 
The verdict:  Hands down, this was the easiest pudding I’ve steamed, though at 3 hours, it was the longest steaming, too.  Results were like a moist, less-spicier-than-gingerbread type of cake.
 
2 c. whole wheat flour
1/2 t. soda
1/2 t. salt
1 c. milk
1/2 c. molasses
1 c. stoned dates
Sift soda and salt with the meal; add dates until they are thoroughly floured; add milk and molasses. This will make a soft batter but the dry flour absorbs a great deal of the moisture. Steam three hours in a closed mould. Serve with any plain pudding sauce or whipped cream.
If sour milk is used add one level teaspoon of soda. Raisins, figs, prunes, or chopped apples make a pleasant variety.
Mary notes:

It didn’t taste heavy like I expected of whole wheat flour, though I used King Arthur Unbleached White Whole Wheat.

Final thoughts:  very easy, made with usually-at-hand ingredients, pleasant tasting, not exciting, but a simple recipe that would be good for a first-time steamer.


Pudding cut (800x600) - steamed pudding

Instead of dates, I chopped up a honeycrisp apple. And I also tried one thing that’s worked well for me with other puddings; I put a bit of seedless raspberry jam in the bottom of the mold. With other puddings, I’ve found that adds a nice color and flavor once the pudding is unmolded. But with this pudding, the jam never melted into the cake and remained a slightly gooey mess once I unmolded it. On the good side, the jam actually stuck with the cake and came cleanly out of the mold. But I wouldn’t add the jam the next time I make this.

BLUEBERRY PUDDING

The verdict: 
I have a new favorite pudding recipe!  This one is just as easy as the Whole Wheat pudding. But it’s tastier and steams for only 1 hour (instead of 3). 
3/4 c. sugar
1/4 c. butter
2 c. flour
3 t. baking powder
1/2 t. salt
3/4 c. milk
1 egg
1 pint blueberries
Mary notes:

I creamed the butter and sugar, then added an egg. Then I added half the dry ingredients, alternating with half the milk, then dry, then milk.  The batter was smooth and thick
.

I used frozen blueberries. I wasn’t sure how much flour to use to flour the berries, but I wound up using two tablespoons.
 
I steamed the pudding for just over an hour, then took it out, removed the lid, and let it sit for 15 minutes still in the mold.
finished pudding still in mold
 When the pudding was still in the mold, the bottom looked pale and not so appetizing. But unmolded, (and flipped right side up), it had a nice brown color. (Although sadly, the blueberries hide my pudding mold’s decorative fluting on top.)

finished pudding from side

The pudding is surprisingly light tasting and refreshing…though the batter was heavy, the final cake is not. Very good and I’ll look forward to making this again.  I wonder if it works with apples or currants or other fruits…

finished pudding cut

The recipe suggests serving the Blueberry Pudding with Creamy Sauce:

1/4 c. butter
2. c. powdered sugar
1 egg
1 t. vanilla

Cream the butter, add the sugar; cream together; add the cream, the egg well beaten, and flavoring.  If it should separate set it over hot water and stir until smooth.  Serve cold.

# # #

If I’d had Mary’s instructions, I probably wouldn’t have had trouble unmolding our Christmas pudding. (It tasted fine, though, and we enjoyed it anyway.)

Version 2

But now I’m psyched to try one of these puddings. If you steam a pudding, let us know how it goes! And huge thanks to Mary for sharing her time and knowledge.